AccountEdge Connect
Set Up and Sync
Create an Account
- Go to connect.accountedge.com.
- Click Signup.
- Select a plan from the list.
- Enter the email address you would like to use for administrative access.
- Select your Country.
- Enter in a password.
- Click Next.
- Select your AccountEdge version from the drop-down.
- Check your email for the AccountEdge Connect Registration email.
- Click the Activate My Account link from the email you receive. You will see a ‘Your account has been activated…’ message.
NOTE: To look up your current AccountEdge version: Mac users can click on AccountEdge on the top menu bar and then About AccountEdge from the drop-down. Windows users can click on Help on the top menu bar and then About AccountEdge from the drop-down.
Link To Your Company File
-
- In AccountEdge Pro, go to Setup on the top menu bar and select AccountEdge Connect, then select Manage AccountEdge Connect from the drop-down menu.
- Enter the email and password you used to create your AccountEdge Connect account and click Link. Once the link is successful, you have now connected AccountEdge Pro to your AccountEdge Connect account. Your email is displayed, and the options to Sync, Force Sync, Unlink, and Update Password become available.

- Click Sync to begin syncing your AccountEdge Pro Company File to your AccountEdge Connect account. This step may take a few minutes depending on the amount of information that needs to sync.
- A Synchronization is Complete message will appear, confirming that your Company File is now connected. Click OK.
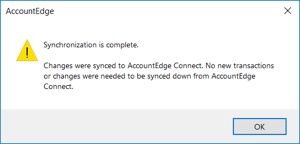
- Click OK.
Access Settings
Now that your AccountEdge Company File is linked to your AccountEdge Connect account, login at connect.accountedge.com to begin setting up your account.
Click Welcome at the top right corner of the page, then select Settings from the drop-down.
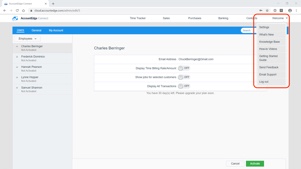
This is where you are going to set your preferences for AccountEdge Connect and enable login access for other employees or vendors.
NOTE: The email and password that was used to create your new AccountEdge Connect account is your Admin level access. Regular users will not have access to AccountEdge Connect admin-level settings.
Users
You can enable access to AccountEdge Connect for your employees or vendors, allowing them to enter transactions online.
To give someone access to login to AccountEdge Connect, select their name from the list and click the green Activate button. This will send your employee or vendor an email to activate their access to AccountEdge Connect and set a password for themselves.
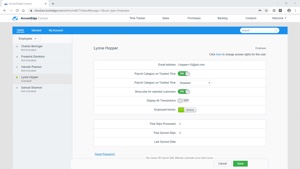
Once their account is activated, they will be able to login to AccountEdge Connect.
You can also set additional preferences for each user:
- Display Time Billing Rate/Amount – Shows the user the billable rate when creating activity slips.
- Payroll Category on Tracked Time – When a user creates a timesheet, you can set if a payroll category is disabled, enabled, or required.
- Show jobs for selected customers – Only show a user the jobs that are linked to the specific customer they are creating the transaction for.
- Display All Transactions – Allow users to see all transactions entered, or just the transactions that they have entered.
If your employees or vendor/subcontractors are entering activity slips or timesheets, you’ll see the Total Slips Processed, Total Synced Slips, and the Last Sync Date.
The Admin can also reset a user’s password from this screen as well as grant user access to the various functional areas in AccountEdge Connect, using Settings – General – User Access Settings.
NOTE: Your employee and vendor contact list is synced from AccountEdge Pro. If you do not see an employee or vendor name listed, go back to AccountEdge Pro and make sure they are listed. If you need to give a new employee or vendor access to AccountEdge Connect, make sure to sync after you have added them to AccountEdge.
General
Transaction ID
You can choose to have custom transaction ID’s for transactions created in AccountEdge Connect or have AccountEdge Pro assign the transaction ID’s when synced.
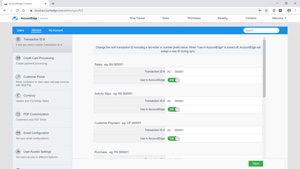
You can set a custom transaction ID for:
- Sales
- Activity Slips
- Customer Payment
- Purchase
- Receive Money/Customer Payment
- Spend Money/Pay Bills
To have AccountEdge Connect assign the transaction ID:
- • Set the ‘Use in AccountEdge’ switch to ‘On’
- • You can set a two letter or number prefix to the transaction ID
- • You can also pick the transaction ID number you would like to start with
NOTE: By default, AccountEdge Connect sets the transaction ID prefix to ‘AC’ and the first transaction number to 000001. This is a simple way to get started with AccountEdge Connect and custom transaction ID’s. You will easily be able to see where the transaction was created when looking at the transactions in AccountEdge Pro.
To have AccountEdge Pro assign the transaction ID:
- Set the ‘Use in AccountEdge’ switch to ‘Off’
NOTE: AccountEdge Pro will set the transaction ID for the transactions when you sync based on the number sequence in AccountEdge Pro.
Credit Card Processing
You can set up your AccountEdge Merchant Account to be used in AccountEdge Connect. This will allow you to accept credit card payments on sales or open receivables.

NOTE: If you already have your AccountEdge Merchant Account set up in AccountEdge Pro, your account information will sync with AccountEdge Connect.
To set up your AccountEdge Merchant Account, you will need to do the following:
- Enter your Merchant ID and Processing Password.
- Enter your API Login ID and Secure Transaction Key.
- In Forte’s Virtual Terminal, select Gateway Settings, then select Secure Web Pay.
- Copy this URL and paste it into the Return Page field: https://cloud.accountedge.com/achpaymentresponsecharge.
- Click Update.
NOTE: If you do not have an API Login ID and Secure Transaction Key, you will need to generate it on the Forte’s Virtual Terminal. If you are already processing credit card payments in AccountEdge Pro, you may already have this information. If you need to regenerate these keys in Forte’s Virtual Terminal for AccountEdge Connect, you will need to add the new set in AccountEdge Pro again.
Customer Portal
Create your Customer Portal URL and their My Account page for customers to view open sales, make payments, and update credit card details. Allow them to view their open and paid invoices, apply credits, and submit a payment. You can also have them submit a one-time payment without having to create an online account.
Customer Portal Setup
- Customer Portal Name: Your unique URL to share with your customers to allow them to view their invoices and apply payments
- URL Preview: This is what your unique URL will be
- Company Name: Add the company name you would like displayed on the Customer Portal when your customers log in
- Contact Email: Add the email address you would like listed on the Customer Portal so your customers can contact you
- Contact Phone: Add the phone number you would like listed on the Customer Portal so your customers can contact you
Payments
This is where you can enable AccountEdge Web Pay, which allows your customers to make partial or full credit card payments online to their open invoices and manage their credit card credentials.
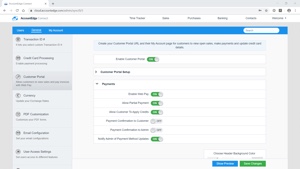
Web Pay requires an AccountEdge Merchant Account to process credit cards. To use Web Pay, you’ll need to do the following:
- Enable credit card processing in AccountEdge Connect
- Enable Web Pay in AccountEdge Pro
- Enable Web Pay in AccountEdge Connect
Enable Web Pay in AccountEdge Pro
- Go to Setup on the top menu bar.
- Select Customer Portal Setup, then Setup Customer Portal & Web Pay. Click Next.
- Enter your email and password for your AccountEdge Connect account (if you have not yet linked your account). Click Next.
- Enter your AccountEdge Merchant Account information (if you have not yet linked your account). Click Next.
- Enter your unique URL for your customers to go to in order to pay their bills online. Click Next.
- Setup is complete. Click Close.
Enable Web Pay in AccountEdge Connect
- Go to Welcome at the top right corner of the page, then select Settings from the drop-down.
- Select the General tab.
- Click Credit Card Processing and enter in your AccountEdge Merchant Account information (if you have not yet linked your account). Click Save.
- Select Customer Portal from the column on the left, and then the Payments section. Switch the Enable Web Pay to On.
- Continue to select your settings based on your needs.
- Allow Partial Payment
- Allow Customer To Apply Credits
- Payment Confirmation to Customer
- Payment Confirmation to Admin
- Notify Admin of Payment Method Updates
- If you would like to add a logo to the unique Web Pay landing page sent to your customers by the Pay Now link, select Choose File.
- If you would like to change the background or font color on your landing page, make your selections.
- Click Show Preview to review what your customers will see.
- Click Save Changes.
Currency
If you create transactions in multiple currencies, you can sync AccountEdge Connect with Yahoo Currencies to get the latest currency rates. This information will also sync back to AccountEdge Pro.
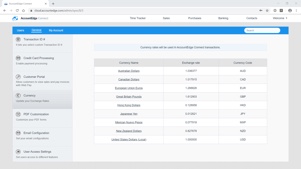
To add a new currency to this list, you need to add it in AccountEdge Pro.
In AccountEdge Pro, go to List on the top menu bar and select Currencies. Click New to add a new currency.
Enter the currency information and make sure the currency code is correct to sync with Yahoo Currencies.
NOTE: This is available only if you have selected the ‘I Deal in Multiple Currencies’ option in the System view of the Preferences window.
PDF Customization
Customize the look of your sale and purchase PDFs that you send to customers.
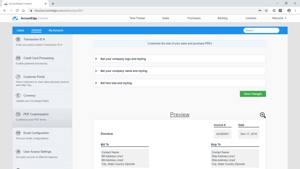
Upload your company logo and/or add your company name to the top of your invoices. Select your preferred sizing and alignment.
Select your default font family, font size, heading style, and field colors to customize the look for your business.
Email Configuration
Set your defaults for how AccountEdge Connect will send emails.
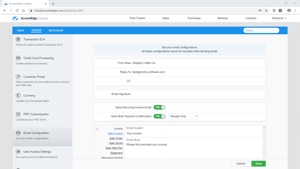
- From Alias: The name that your customer sees in their email program
- Reply-To: The email address your customer can send a reply email to
- CC: If you would like to copy anyone on the email
- Email Signature: This will be at the bottom of emails sent from AccountEdge Connect. Most people put their Company Name or their own name
- Send Recurring Invoice Email: Send an invoice automatically for recurring invoices
- Send Bulk Payment Confirmation: Send confirmation of payment for bulk transactions
- Default Email Text: Set up custom email subject and message for various transaction types. Select the + next to each transaction type to set your default messaging
User Access Settings
You can select what features in AccountEdge Connect that an employee or vendor will have access to when they log in.

You can copy settings from another employee for a quicker setup.
General Settings
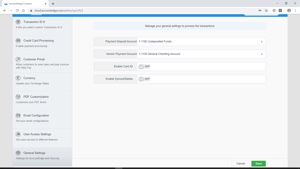
Set which account to use when receiving money and making payments.
It will pull the defaults from AccountEdge Pro, but you can override the selection for transactions created in AccountEdge Connect.
Enable Card ID will display the ID in the Cards List, which can be used to sort and search for a card.
Enable Synced/Delete will allow you to manually override a transactions sync status.
My Account
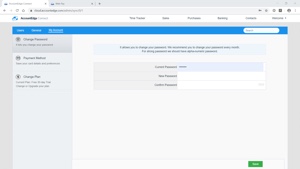
Change Password
If you need to change the administrator password.
Payment Method
If you need to change the payment method for your AccountEdge Connect account.

Change Plan
If you need to change your AccountEdge Connect plan.

Sync
You can sync your Company File with AccountEdge Connect a few ways. These steps are performed in AccountEdge Pro.
Option 1

Click the AccountEdge Connect icon on the upper right side of any Command Center window.
Option 2

Go to the Sync button at the bottom of the AccountEdge Command Center, then select AccountEdge Connect from the drop-down.
Option 3
Go to Setup on the top menu bar and select AccountEdge Connect, then select Manage AccountEdge Connect. Click Sync.

Any of these options will sync your Company File with AccountEdge Connect.